

A guy named Marcus called me in early 2024. He’d been watching YouTube videos all weekend, convinced he could throw together an infrared sauna in 48 hours. He had a parts list from some random blog, a budget under a grand, and zero understanding of how infrared heat works.
Marcus didn’t build his sauna in 48 hours. He didn’t build it at all, because the first thing I told him was that he was about to waste three months and a few thousand bucks on a warm box that wouldn’t do what he thought it would.
Here’s the problem with most DIY sauna guides online. They hand you a parts list and a “watts per cubic foot” formula that’s designed for traditional hot-rock saunas. Infrared doesn’t work that way. Infrared heaters radiate electromagnetic energy straight into your body.
The air temp barely matters. What matters is how close the heater is, how much of your body it covers, and whether the wavelength actually matches what human tissue absorbs.
Then it lays out two real paths: a fully engineered kit (SaunaCloud) that removes nearly all the risk, and a budget-friendly build using NIR bulbs that I tested myself in a shed.
Key takeaways
- Doubling your distance from the heater cuts the therapeutic dose by 75% — a heater 6 inches away delivers roughly four times the dose you get at 12 inches, and sixteen times the dose you get at 24 inches.
- Skipping the foil-faced insulation adds 20+ minutes to heat-up time and costs $3,200 to redo; skipping the vapor barrier guarantees mold within a year with $10,000–$30,000 remediation.
- Red light therapy (660nm + 850nm) requires 2–6 inches of clinical proximity — wall panels mounted two feet away provide ambient light, not therapy.
The physics most DIY guides get wrong
Ignore the wattage rule. It’s the single biggest mistake in infrared sauna building.
Doubling your distance from the heater cuts the therapeutic dose by 75% — proximity is everything.
Standard sauna guides tell you to calculate watts per cubic foot of room volume. That works when you’re heating air with a stove. But infrared heaters don’t heat the air. They shoot electromagnetic radiation directly at your body.
The air stays cooler. You sweat because the radiation penetrates your skin and tissue.
So what matters? Three things: how close the heater is, how wide its coverage angle is, and whether its wavelength matches what your body absorbs.
Inverse square law, in plain English. Energy drops off with the square of the distance. If you sit 6 inches from a heater, you get about 4 times the dose you’d get at 12 inches. At 24 inches, you’re getting 1/16th of what you’d get at 6 inches.
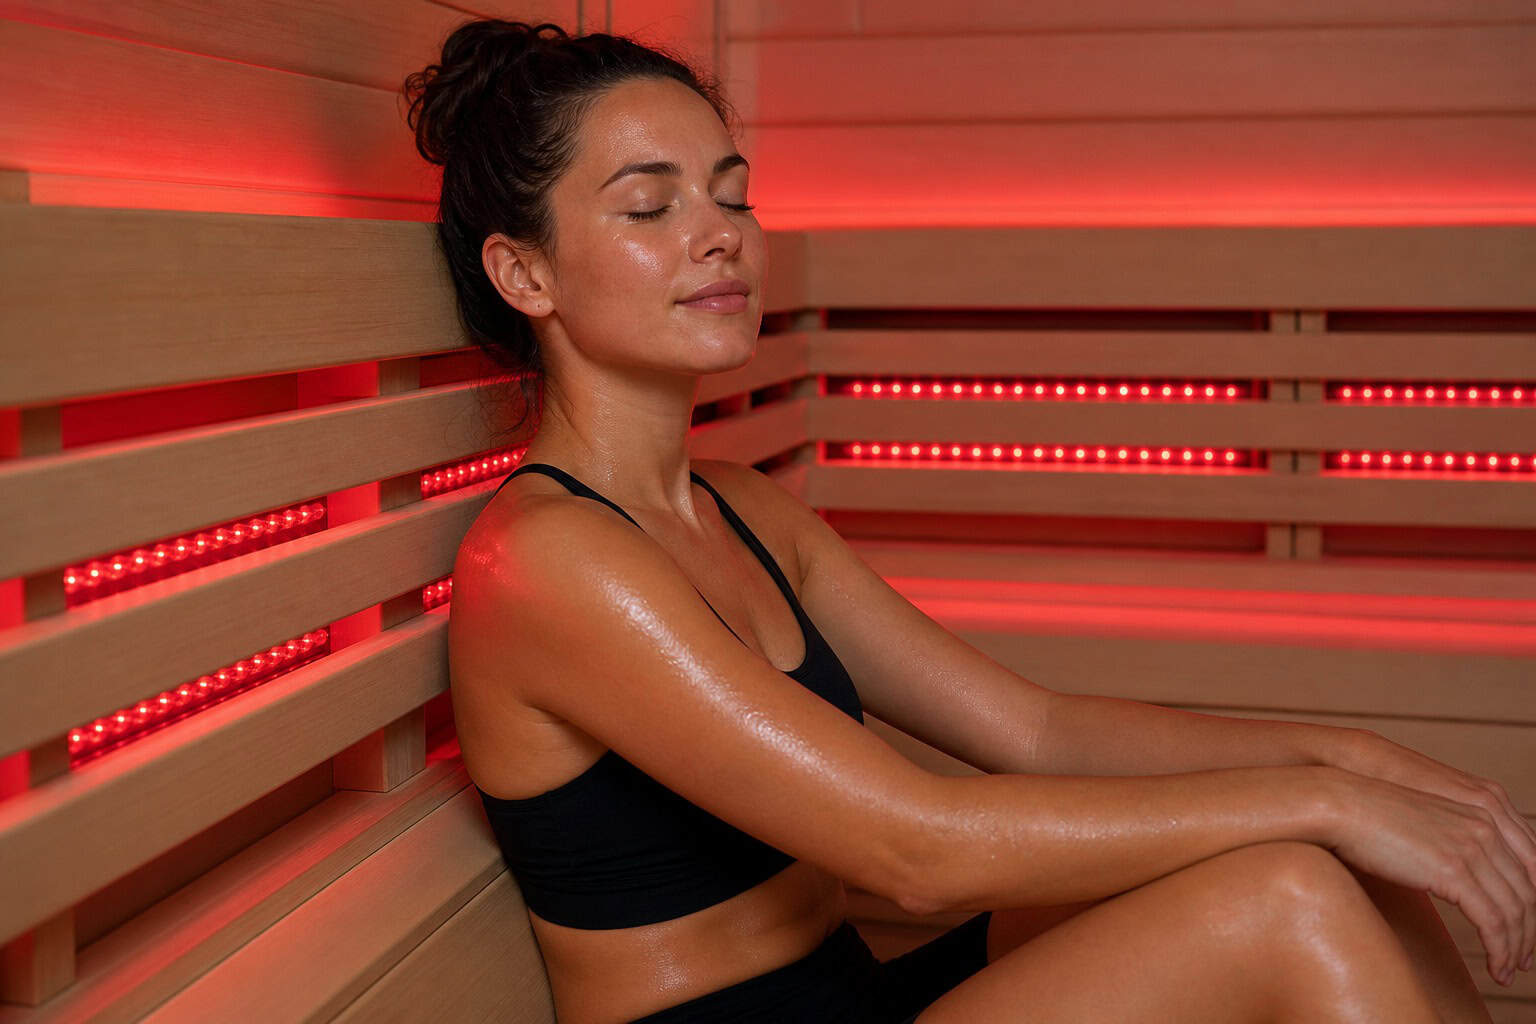
Coverage geometry matters just as much. Your body has roughly 18–22 square feet of surface area. A single wall heater covers about a third of that — call it 30%. Put heaters on all four walls plus overhead, and you’re covering 85–95%. That’s the gap between a “warm box” and an infrared sauna.
Wavelength absorption. Human tissue absorbs far infrared best in the 7–10 micron range. Good heaters are tuned to that sweet spot. VantaWave panels, for example, hit 7.9 microns. Generic Amazon panels claim 8–12 microns but lack any wavelength control — you get whatever the factory spit out that day.
Planning your build: Space, budget, and the three paths
First, what you can skip: special ventilation, plumbing, waterproof flooring, or a floor drain. Many people assume a wet location is required. It is not. You need a room with standard framing, electrical access, and enough space for a bench.
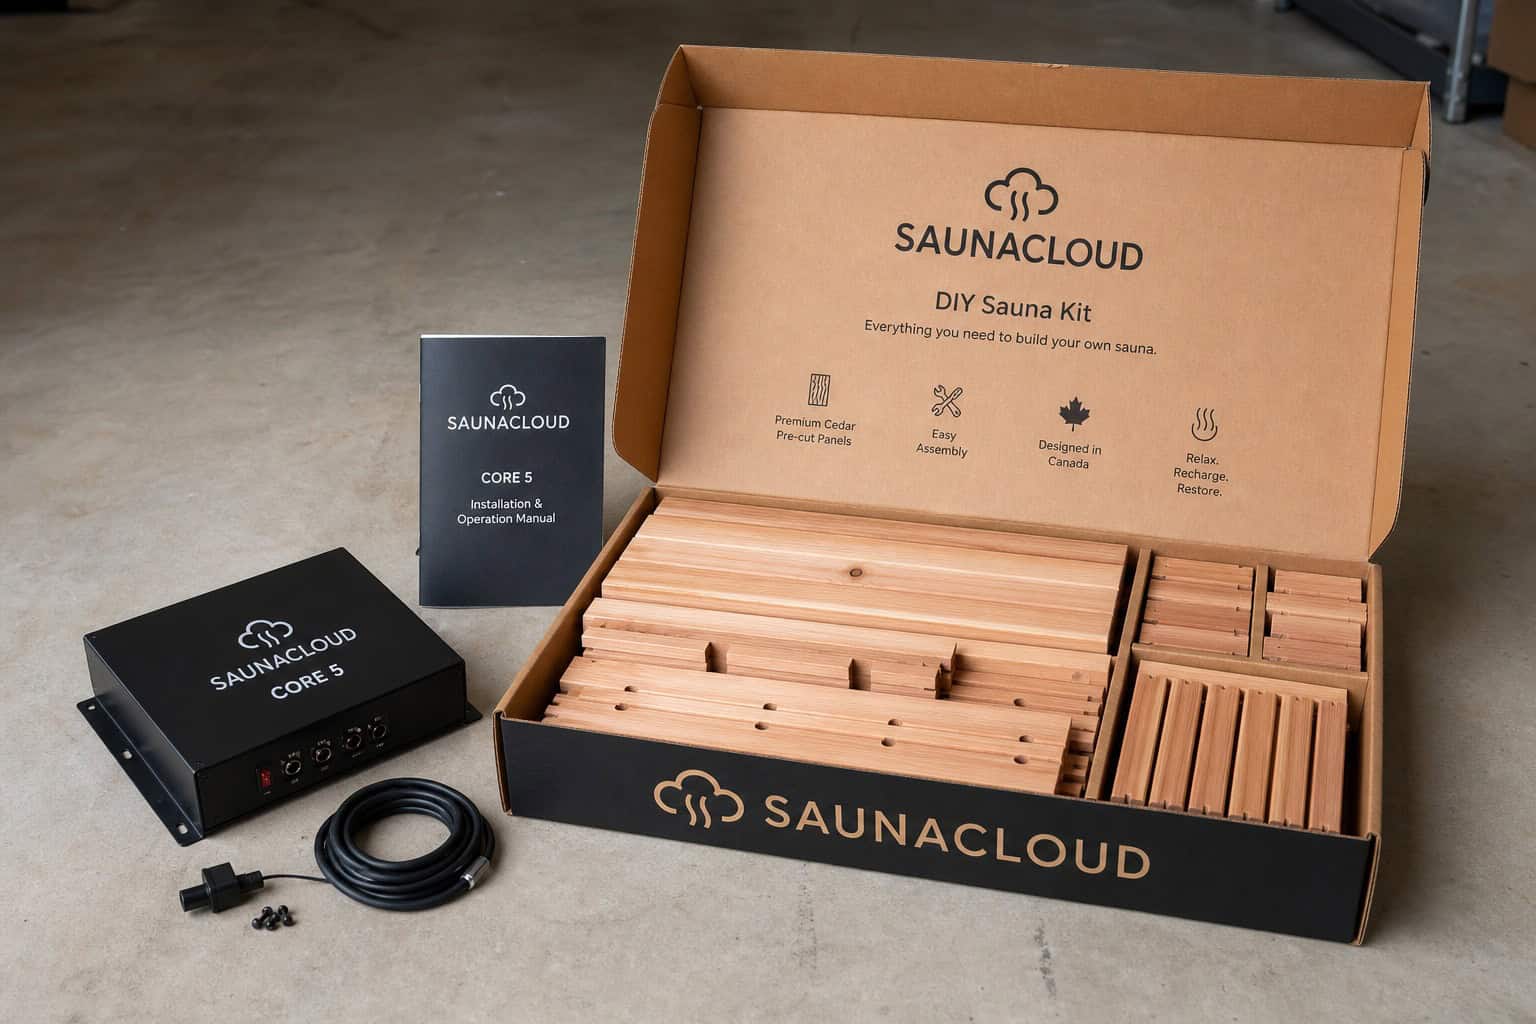 The SaunaCloud kit removes nearly all the risk for $6,000–$17,000 installed, with a 7-year warranty.
Minimum space. One person: 4×4 feet. Two people: 4×5 or 5×5. Three or more: 5×6 or bigger.
Ceiling should be 7–8 feet — absolute minimum 6.5 feet. Any lower and you’ll feel like you’re in a coffin.
Location. Try to site it within 50 feet of your electrical panel. Longer runs mean thicker wire and higher cost. A closet conversion is common and works great if the closet is at least 4×4 interior — the video series shows exactly how to do it.
Three build paths, with real numbers.
- Full DIY from scratch. Materials: $3,500–$6,500. Time: 40–100+ hours of your labor. Risk: high.Component warranties top out at 90 days. Zero engineering support. If you make a mistake, you own it.
- SaunaCloud kit. Kit cost: $5,000–$15,000+. Labor (if you hire a contractor): $500–$2,000. Electrician: $200–$800.Total installed: $6,000–$17,000. Timeline: 8–12 weeks from order to first session. Comes with a 7-year warranty, pre-cut cedar, CORE 5 power supply, and full engineering support. The founder, Chris, has built over 3,000 custom saunas since 2014 — when something goes wrong, they’ve seen it before and can talk you through it.
- Quality prefab. $3,000–$8,000. Fixed dimensions, often imported components. 1–5 year warranty. Limited customization. You’re buying convenience, but you’re also buying someone else’s design choices.
Choosing your heat source: Far IR panels vs. NIR bulbs
Not all infrared is the same. You’ve got two main options for the heat source, and they work differently.
Far IR panels. These are the flat panels you see in most commercial saunas. The good ones — like VantaWave, are tuned to 7.9 microns, right in the middle of the 7–10 micron absorption band, and you can find community discussion about such technology on r/InfraredSaunas. They also have low EMF (below 0.20 mG). They run at lower surface temps (around 200°F) and last a long time.
The cheap stuff on Amazon: panels that claim 8–12 microns but offer no quality control. Surface temp around 140°F. EMF can hit 20–100 mG — that’s a lot of electromagnetic field buzzing around your head. Lifespan 3–5 years. No way to control the wavelength.
Does this even matter for health? Well, do saunas increase testosterone? You’re buying a lottery ticket.
NIR bulbs. Near infrared bulbs like the TheraBulb 300W output wavelengths of 700–1000nm, with the predominant range at 700–750nm. They also emit visible red light (650–699nm), which helps you aim the light and adds some benefits. These bulbs hit 500°F at the surface — they’re bright and hot. They’re CE certified, RoHS compliant, tested in an ISO 17025-accredited lab, and for those seeking a full-body experience, these work well in red light infrared saunas. 15% more power than a typical 250W bulb.
Red light therapy vs. infrared sauna heat — they’re not the same thing. Far IR (7–10 microns) penetrates deep tissue and works at distances of 6–12+ inches, while red light therapy (660nm + 850nm) requires clinical proximity of 2–6 inches. They complement each other, but you can’t mount a red light panel on the wall at two feet and call it therapy—that’s ambient light, unlike the integrated panels found in a high-end infrared sauna with optional red light in the bench.
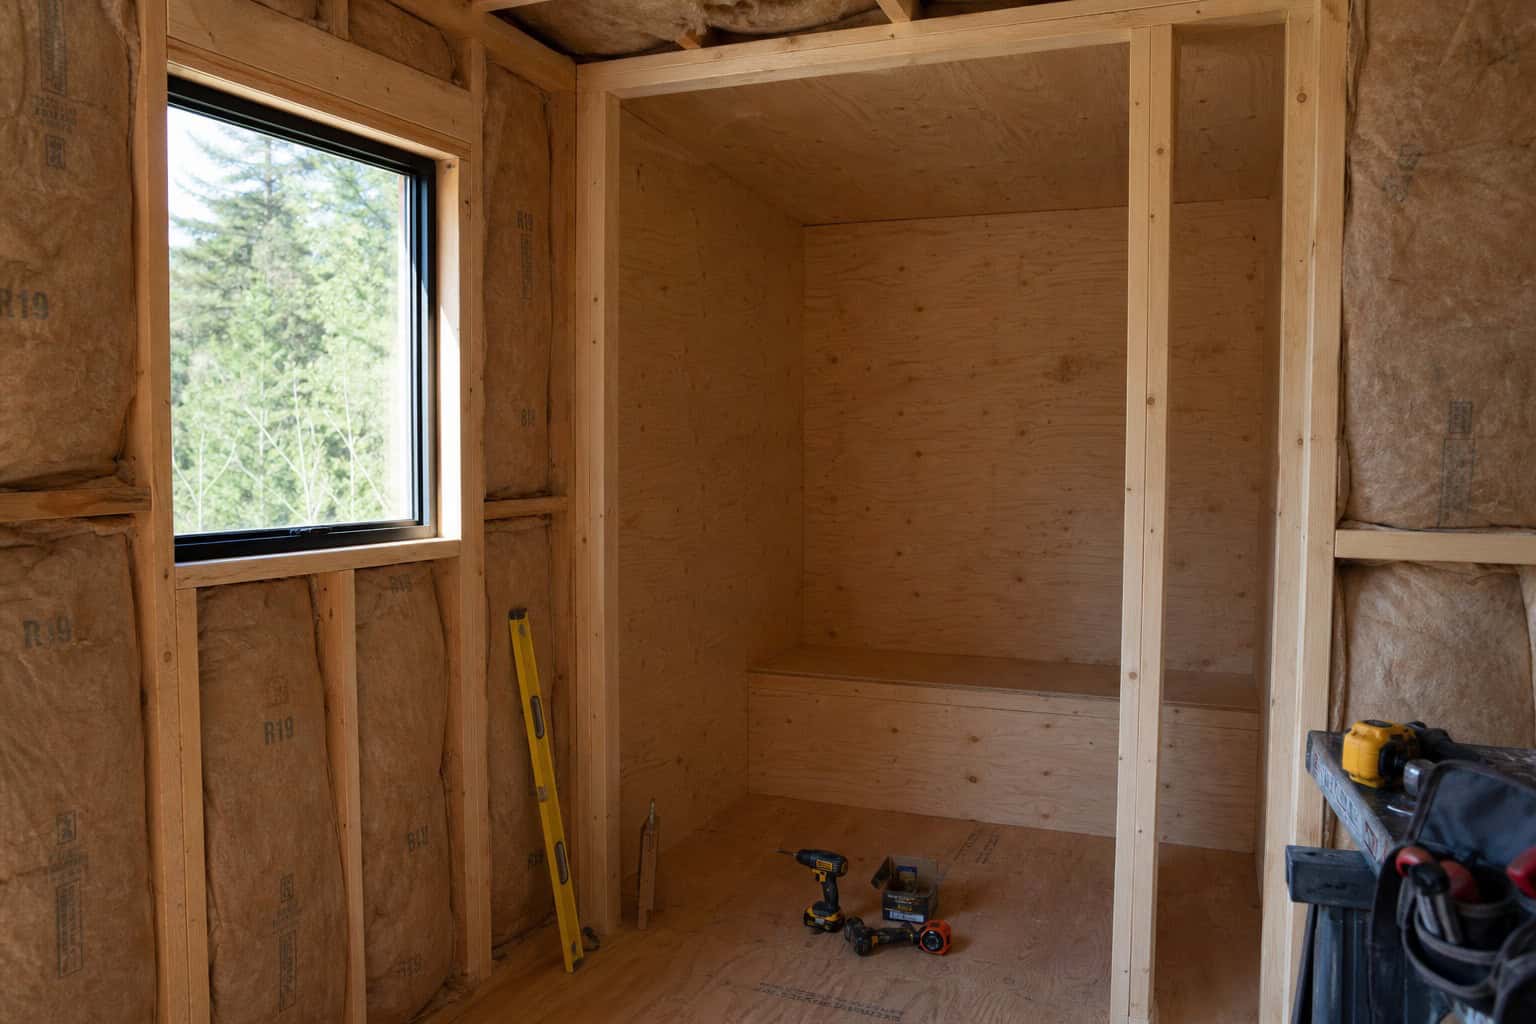
Materials: What to use and what to avoid
This is where most DIY builds go sideways. The materials list seems boring until you skip the wrong thing and pay for it later.
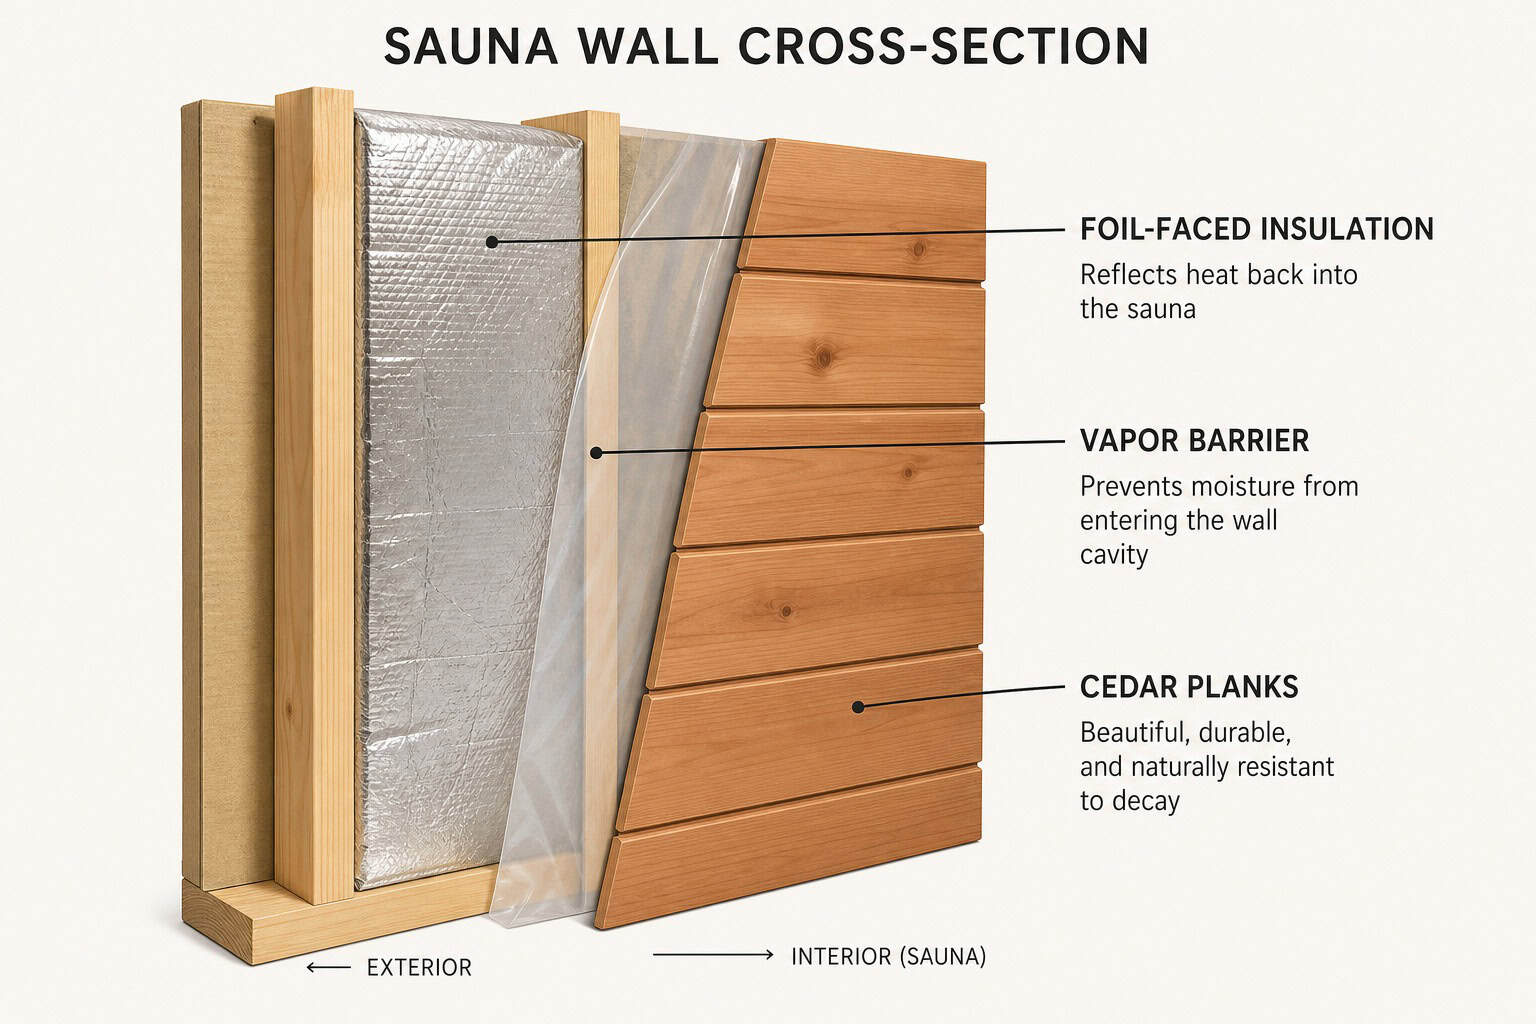 Skipping the foil-faced insulation adds 20 minutes to heat-up time; skipping the vapor barrier guarantees mold.
Foil-faced insulation is not optional. Infrared is electromagnetic radiation. Standard fiberglass lets it pass through. Foil-facing reflects it back into the room.
Without it, your sauna takes 35–45 minutes to heat up. With it, 12–18 minutes. Cost to redo after the walls are closed: about $3,200. Premium at build time: about $150. That’s an easy call.
The $50 vapor barrier saves $10,000–$30,000. Run 6-mil polyethylene on the warm side of the wall. Keeps moisture from getting into the insulation. Skip it, and you’ll find mold within 6–12 months.
Mold remediation runs $10,000–$30,000. The vapor barrier costs $50. Do the math.
Western Red Cedar is the gold standard. Naturally antimicrobial, dimensionally stable, smells great. Get clear-grade, kiln-dried tongue-and-groove. Avoid hemlock (warps, no antimicrobial), basswood (degrades in heat), poplar (splits), pine (sap bleeds when heated).
Plywood with urea-formaldehyde is dangerous. When heated, it off-gasses carcinogens. Only use formaldehyde-free plywood — Columbia Forest PureBond, available at Home Depot.
For the NIR bulb build: 2x4s, formaldehyde-free birch plywood, R19 insulation (keeps it hot even in winter, reaching over 140°F). Never seal, stain, or paint interior cedar. Let it breathe.
Electrical: Code classification, circuits, and safety
Most DIY guides skip this entirely. Your local inspector won’t.
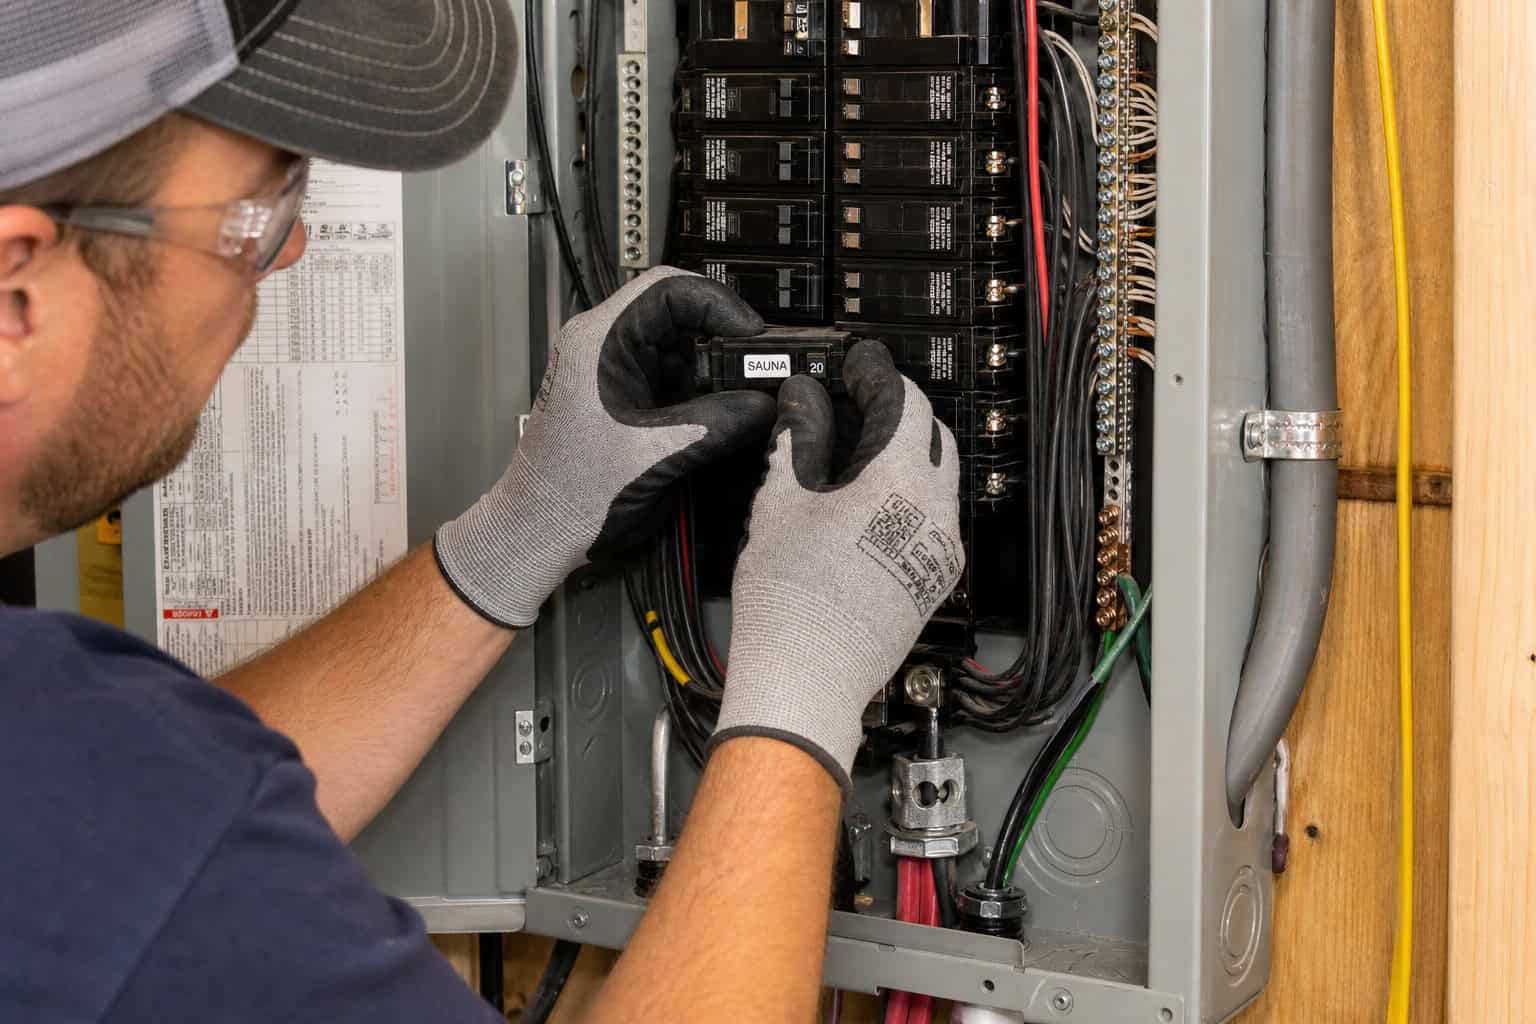 A dedicated circuit is non-negotiable — $200–$800 for an electrician now saves thousands in fire risk later.
NEC Article 424 applies, not Article 422. That’s “Fixed Electric Space Heating,” not “Appliances.” Your electrician needs to know this before they pull the permit. SaunaCloud has a code expert named Chad who can talk to your inspector if they have questions — they’ve resolved hundreds of these conversations. A typical household outlet runs on a 15 amp circuit, which is insufficient for most sauna heaters.
Dedicated circuit sizing. Small builds: 120V/20A dedicated circuit. Larger builds: 240V/30A or 50A. “Dedicated” means the sauna is the only thing on that circuit. No lights, no outlets, nothing else.
CORE 5 power supply architecture. This is what SaunaCloud uses. It takes your main power input, distributes it to individual heater zones, provides overcurrent protection at the heater level, and includes WiFi control. Temperature is sensed at the occupant position — where you sit, not on the ceiling.
Why you hire an electrician. $200–$800 now. The alternative: a homeowner I know wired his sauna to a 15A bedroom circuit, then upsized the breaker to handle the load on undersized wire. That’s a fire hazard. Fixing DIY electrical mistakes runs $2,000–$5,000. Spend the $200.
Integrating red light therapy: Proximity is everything
You’ve seen the photos. Guy mounts a red light therapy panel on the wall at two feet away, calls it a “therapy sauna.” That doesn’t work.
 The shoe rack method puts NIR bulbs 6–12 inches from your body — cheap, adjustable, and it works.
Why 2–6 inches matters. Red light therapy (660nm + 850nm) requires clinical proximity. The LEDs need to be close to your skin. Wall-mounted panels at 24 inches give ambient light, not therapeutic benefit. Period.
 Red light therapy requires 2–6 inches of proximity — bench-integrated panels get it right; wall-mounted panels don’t.
Mounting methods that work.
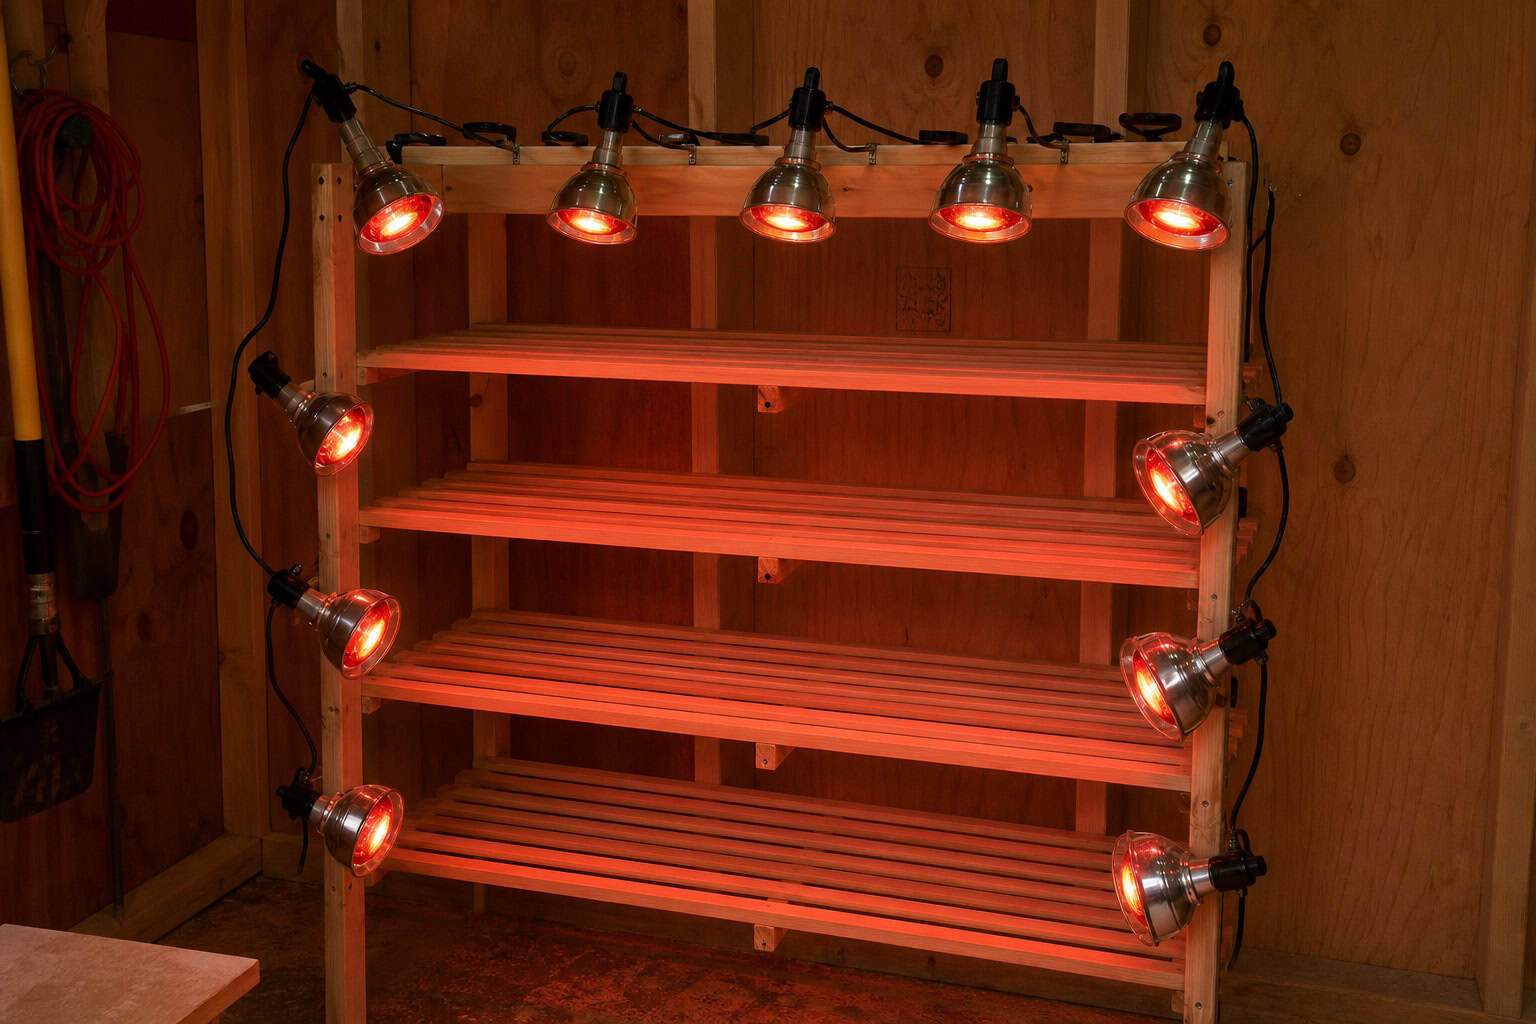
- Shoe rack method. I use a 50-pair shoe rack with ten clamp lamps (rated 300W, metal and ceramic — the plastic ones will melt). Five lamps per side. Clamp lamps are secured with Velcro cable ties and zip ties. It’s cheap, adjustable, and puts the bulbs 6–12 inches from your body.
- Vertical 2×4 on opposite wall. Five lamps mounted directly to a 2×4. Same distance, same effect.
- Bench-integrated panels. The SaunaCloud approach integrates red light LEDs into the bench at the correct distance. Future-proof if you’re not adding it now — their plans include wiring provisions.
Electrical specifics for the NIR bulb array. You need two dedicated 20A circuits. A 15A circuit (typical household outlet) can deliver 1800 watts max (realistically 1500 usable) — not enough for ten 300W bulbs. Two 20A circuits give you 4000 usable watts, enough for thirteen 300W bulbs.
Each lamp draws 2.46 amps. Total draw measured at the circuit: 12.78 amps. Well within spec. Use 20A power strips with overload protection.
Optional: hot tub timer switches (spring-loaded dials that shut everything off after a set time). A large fan helps distribute heat evenly throughout the sauna, while a small fan can be placed near the bulbs to keep the air moving.
Step-by-step: Building a NIR bulb sauna
This is the build I tested in my shed. Dimensions: 5’8″ length × 4’2″ width, inside height 5’10”. Roughly the size of a half-bathroom. Ideal room size for efficiency is around 5×5 feet — big enough to sit, small enough to heat quickly.
 Standard 2×4 framing and formaldehyde-free plywood keep the build safe and straightforward.
Materials list.
- 10 × 300W TheraBulb NIR bulbs
- 10 brooder-style clamp lamps rated for 300W (all metal/ceramic)
- 50-pair shoe rack (or build a 2×4 frame)
- Two 20A power strips with overload protection
- Velcro cable ties
- IR 3.0 eyewear
- 2x4s, formaldehyde-free plywood (Columbia Forest PureBond), R19 insulation
- 2 × 20A GFCI outlets, 2 × 20A circuit breakers with conduit
- Optional: timer switches, fans
Building the structure. Standard 2×4 framing. Formaldehyde-free birch plywood interior. R19 insulation in the walls.
Vapor barrier on the warm side. Install a fan to circulate heat. Add a thermometer and a shelf for water, phone, whatever.
Wiring the electrical. Two dedicated 20A circuits. Each lamp pulls 2.46A. Total draw tested: 12.78A per circuit. Plenty of headroom. Timer switches can be added on the power strips so you can set a session and walk away.
Assembling the NIR light arrays (5 steps).
- Assemble the shoe rack stand. Wheels optional — nice if you want to move it around.
- Unwrap the clamp lamps. Attach Velcro straps to the bases. Leave shatter guards off for now.
- Attach clamp lamps to the stand using Velcro straps and zip ties. Secure but adjustable — you’ll want to tweak the angles.
- Install the 300W TheraBulbs. Hand-tight is fine. Then attach the shatter guards.
- Connect cords to power strips. Put on your eye protection. Turn it on.
Heat distribution and mounting configurations. I mount lamps on two sides: one side uses the shoe rack array, the opposite wall uses a vertical 2×4 with five lamps. Fans pointed at each array spread the heat around. Warm-up time: about 20 minutes.
Safety: Eyewear, distance, and daily use guidelines
Incandescent NIR bulbs are bright. Standard sunglasses won’t cut it.
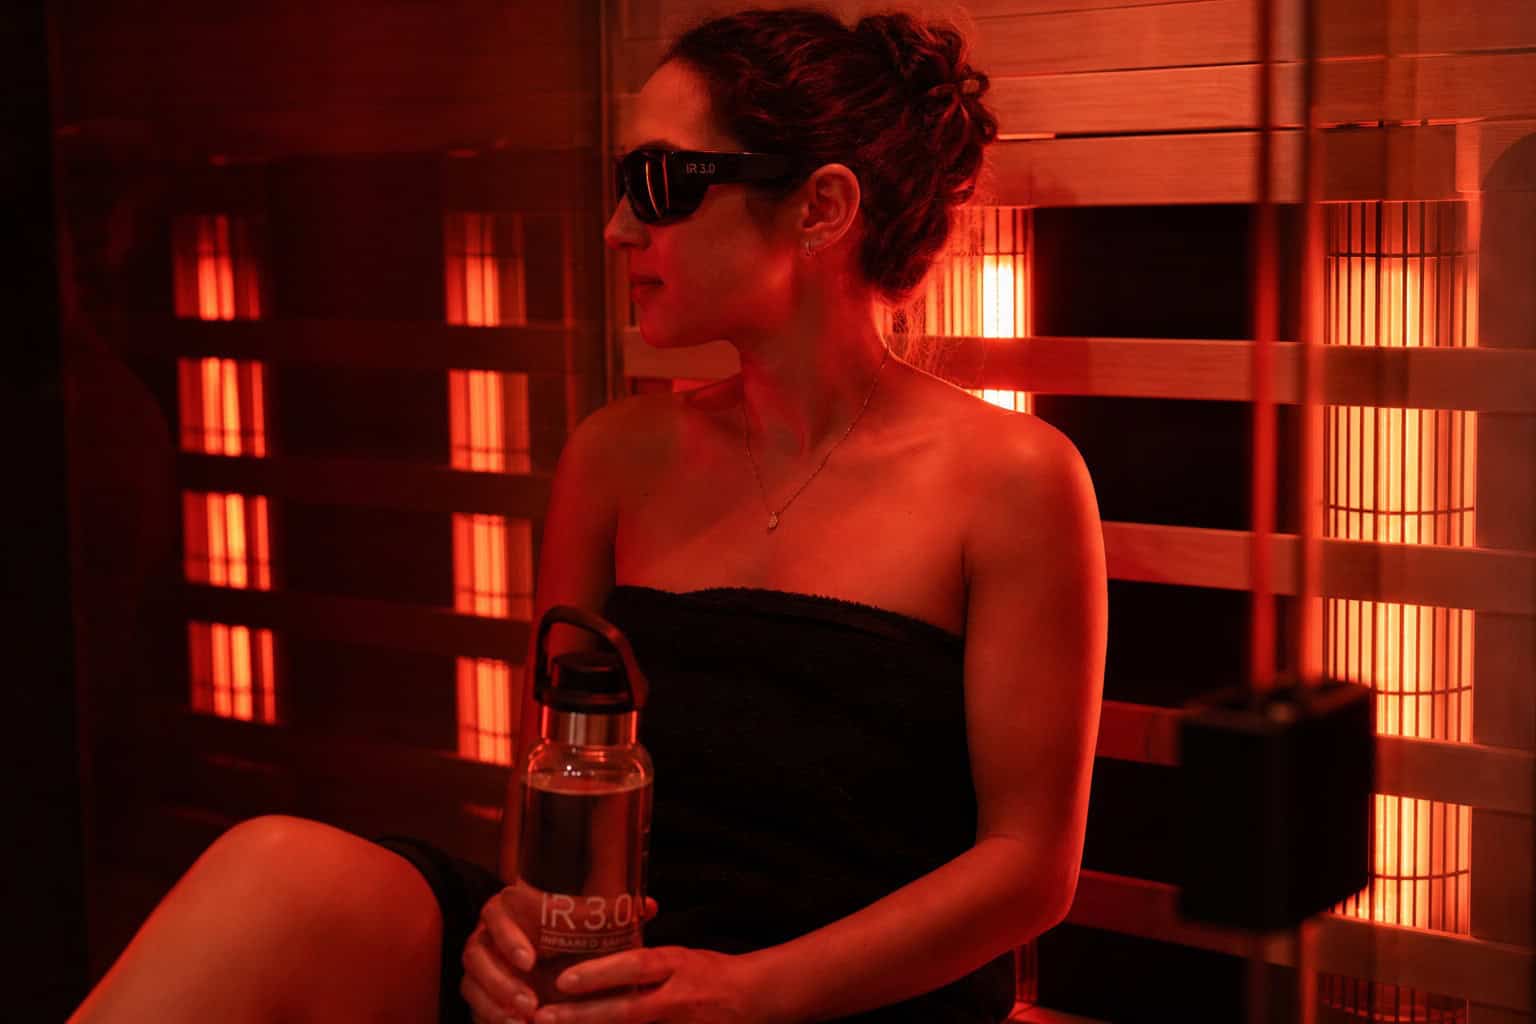 IR 3.0 eyewear blocks 99% of near infrared — don’t skip it, and don’t look directly at the bulbs.
Eye protection: the IR 3.0 standard. TheraBulb IR 3.0 eyewear blocks 98% of visible light (380–780nm) and 99% of near infrared (780–2000nm). That’s the level of protection you need. Don’t skip this. Don’t look directly at the bulbs.
Distance, head safety, and hydration. Sit 12–18 inches from the bulbs. Never point them at your head or face. Drink fluids and electrolytes before and after — you’ll sweat a lot.
Start your session around 100°F and let it build. The insulated sauna can reach over 140°F even in winter.
Medical considerations. Check with your doctor before using, especially if you have heart issues or are on medication. NIR delivers benefits without UV dangers, but it’s still a serious heat source. If you feel uncomfortable, move farther away or turn it off.
Using your sauna: A real-world protocol
I’ve been running this routine 4–5 days a week for over a year. It’s not mandatory, but it works.
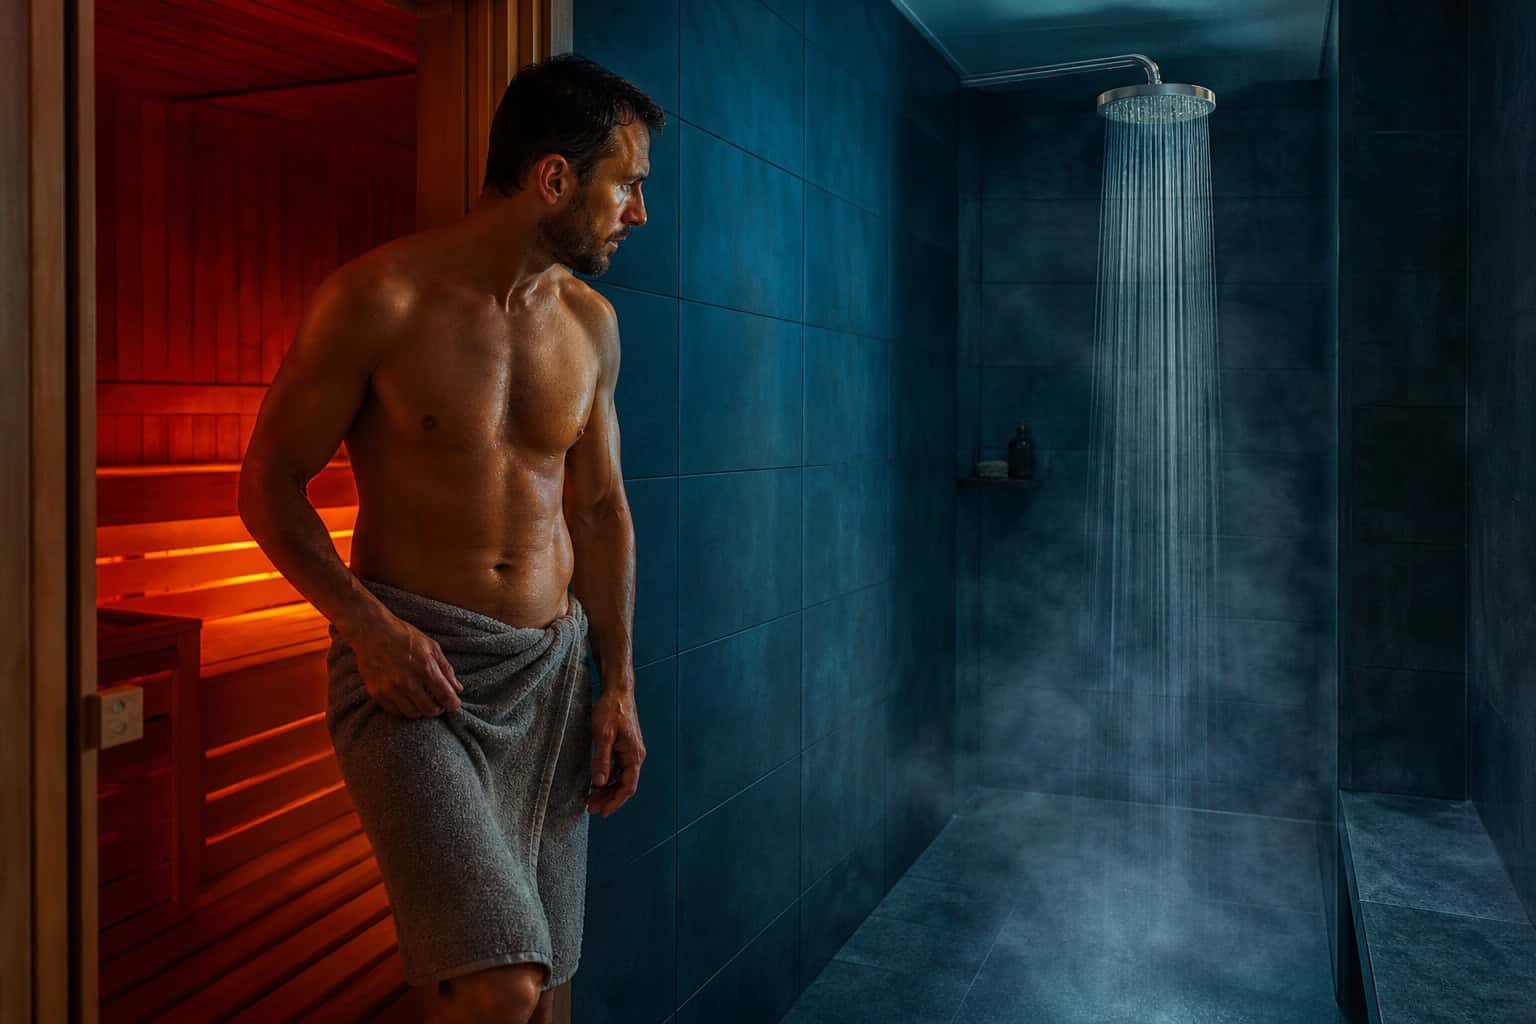 A 1–2 minute cold shower between sauna rounds is backed by Dr. Rhonda Patrick’s work on cold exposure.
My session routine.
- 20-minute warm-up while the sauna heats.
- First round: 20–25 minutes. Gets a good sweat going.
- 10-minute break with a 50°F cold shower for 1–2 minutes.
- Second round: 15 minutes — shorter since you’re already warmed up.
- Optional third round: 10 minutes if I’m feeling it.
- Finish with 30 minutes of yoga. Not required, but a nice way to cool down.
Why infrared feels different. Infrared heat penetrates your body, not the air. So steady 140°F in an IR sauna feels like 170°F in a traditional one. The penetrating heat hits your joints and deep tissue differently.
The benefits behind the routine. Ben Greenfield lists ten reasons for sauna use: heart health, detox, athletic recovery, pain relief, muscle gain/fat burning, immune boosting, skin, sleep, cardiovascular, stress reduction. Finnish longevity studies show results from 4–7 sessions per week. Dr. Rhonda Patrick’s work on cold exposure also backs the contrast shower approach.
Cost comparison and the five costliest mistakes
Three paths compared.
| Path | Cost | Time | Warranty | Support |
| Full DIY from scratch | $3,500–$6,500 | 40–100+ hrs | 90 days max | None |
| SaunaCloud kit installed | $6,000–$17,000 | 8–12 weeks (order to use) | 7 years | Full engineering |
| Quality prefab | $3,000–$8,000 | Variable | 1–5 years | Limited |
The five costliest DIY mistakes.
- DIY electrical. Fixing it costs $2,000–$5,000. Plus the fire risk. Hire an electrician for $200–$800.
- Wrong insulation (no foil-facing). Tear-out and redo averages $3,200. The right stuff costs $150 more at build time.
- Cheap heaters. Can’t fix them — you have to replace them entirely. And you’ll get reduced therapeutic benefit for as long as you own the sauna. That’s 15+ years.
- No vapor barrier. Mold remediation: $10,000–$30,000. The vapor barrier costs $50.
- Poor heater placement. Permanent. Can’t fix it without rebuilding the room. Plan your layout using the inverse square law and coverage geometry from day one.
Choose your path and build with confidence
If you have the budget and want a guarantee, the SaunaCloud kit removes nearly all the risk for $6,000–$17,000 installed. If you’d rather save money and don’t mind doing the work, the NIR-bulb build is fully functional for a few thousand dollars — but you need to follow the materials and electrical specs exactly.
If you’re in Upstate New York and need a licensed electrician who understands NEC Article 424, Find The Home Pros can connect you with vetted locals. Like I said, spending $200–$800 on an electrician is the cheapest insurance you’ll ever buy.
Frequently Asked Questions
Is there a sauna with red light therapy for home?
Yes, but only if the red light is mounted within 2–6 inches of your body. Wall panels at two feet away provide ambient light, not therapy. The SaunaCloud kit integrates red light LEDs into the bench at the correct distance, and you can also build a NIR bulb array using a shoe rack or vertical 2×4 to get clinical proximity.
Can you do sauna and red light therapy together?
Yes, but they work at different distances. Far infrared sauna heat penetrates at 6–12+ inches, while red light therapy (660nm + 850nm) requires 2–6 inches of proximity. You can combine both in one session by using NIR bulbs that emit both near infrared and visible red light, but wall-mounted red light panels at two feet won’t give therapeutic benefit.
What is the difference between far infrared and near infrared sauna heaters?
Far infrared panels (7–10 microns) heat by radiating electromagnetic energy that penetrates deep tissue, and they work at distances of 6–12+ inches. Near infrared bulbs (700–1000nm) are much hotter at 500°F surface temp and require 2–6 inches of proximity for therapeutic effect, but they also emit visible red light for additional benefits. Far IR is better for whole-body warmth; NIR is better for targeted red light therapy.
How much does it cost to build a DIY infrared sauna?
A full DIY build from scratch costs $3,500–$6,500 in materials and 40–100+ hours of labor, with high risk and no engineering support. A SaunaCloud kit runs $6,000–$17,000 installed with a 7-year warranty and pre-cut cedar. A quality prefab is $3,000–$8,000 but has fixed dimensions and limited customization. The cheapest option is a NIR bulb build in a small room for a few thousand dollars.
What is the most common mistake in DIY infrared sauna builds?
Skipping the foil-faced insulation. Infrared is electromagnetic radiation, and standard fiberglass lets it pass through. Foil-facing reflects the heat back into the room, cutting heat-up time from 35–45 minutes to 12–18 minutes. Without it, you’ll pay $3,200 to redo the walls. The second biggest mistake is skipping the $50 vapor barrier, which guarantees mold within a year and costs $10,000–$30,000 to remediate.