Installing a mailbox might seem simple, but it can quickly get tricky if you’re unsure where to start. Whether you’re putting up a new one or replacing an old one, the key is to ensure it’s sturdy, and functional and complements your space.
This guide will explain everything step-by-step so you can handle the project with confidence and create a mailbox that looks great and works perfectly.
Understanding USPS Guidelines for Mailbox Placement
Before you grab your tools, it’s important to follow the United States Postal Service (USPS) rules. These guidelines ensure your mailbox is easy to use for both you and your mail carrier while meeting official requirements. Here’s what you need to know:
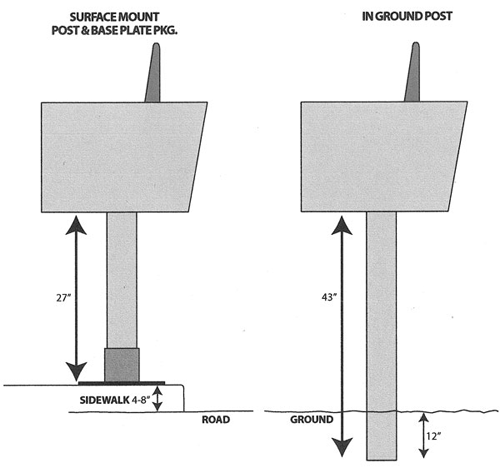
- Height: Make sure the bottom of your mailbox is 41 to 45 inches above the ground. This keeps it at the right height for mail carriers to access easily.
- Distance from the Curb: Position the mailbox door 6 to 8 inches back from the curb. This allows mail carriers to deliver your mail without needing to leave their vehicle.
- House Numbers: Add your house or apartment number clearly on the mailbox or post. This helps ensure your mail gets to the right place and avoids delivery mix-ups.
- USPS-Approved Mailboxes: Choose a USPS-approved mailbox. These mailboxes meet postal regulations, so you can count on smooth and hassle-free mail delivery. Look for the USPS label or approval info when shopping.
Tools and Materials Needed for Installation
Before starting the installation, gather all the materials and tools you’ll need. This will save you time and effort later. Here’s your checklist:
- A USPS-approved mailbox (standard, decorative, or lockable).
- A mailbox post that fits your chosen mailbox.
- A shovel or post-hole digger.
- Cement or a quick-setting concrete mix.
- A level to make sure everything is straight.
- A measuring tape for accuracy.
- A screwdriver and screws.
- Protective gloves to keep your hands safe.
With everything ready, you’ll be able to focus on the fun part, getting the mailbox installed!
Step-by-Step Guide to Installing a Residential Mailbox
- Preparing the Ground
- Choose the Right Spot: Pick a location for your residential mailbox that follows the USPS rules. Avoid areas with underground utilities, call your local utility company to check if you’re unsure.
- Dig the Hole: Use a post-hole digger or shovel to create a hole that’s about 20-24 inches deep and 6-8 inches wide.
- Securing the Post
- Insert the Post: Place the mailbox post in the center of the hole.
- Pour Cement: Mix and pour the concrete around the post until the hole is filled, leaving about 2-3 inches at the top for soil.
- Level the Post: Use your level to ensure the post is perfectly vertical. Let the concrete set for 24-48 hours before moving on to the next step.
- Attaching the Mailbox
- Position the Mailbox: Line it up with the mounting bracket on the post.
- Secure It: Use a screwdriver to attach the mailbox with screws. Open and close the door a few times to make sure it operates smoothly.
Protecting Your Mailbox from Weather and Vandalism
A mailbox that looks great today should still look great years down the line. Here’s how to keep it safe and durable:
- Weatherproofing: Use a weather-resistant sealant to protect wooden posts, and apply rust-proof paint to metal mailboxes.
- Choose Sturdy Materials: Steel or heavy-duty plastic are excellent options for mailboxes that can handle tough weather.
- Add Security Features: Consider installing a lockable mailbox or placing a security camera nearby to prevent vandalism.

Adding a Decorative Touch
Your mailbox doesn’t have to be plain or boring, it’s a great opportunity to add a touch of personality and charm to your home’s exterior! Here are a few ideas:
- Custom Colors: Paint your mailbox to match your home’s color scheme.
- Ornamental Posts: Choose a decorative mailbox post design to stand out.
- Address Plaques: Add a stylish plaque with your house number for a polished look.
FAQs About Lockable Mailboxes
Can I install a lockable mailbox?
Absolutely! Lockable mailboxes are a great choice for added security. Just make sure it’s a USPS-approved model with a mail slot large enough for delivery.
Do lockable mailboxes require extra steps to install?
Not usually. Most lockable mailboxes can be installed just like standard ones. However, be sure to follow the manufacturer’s instructions for best results.
Conclusion
With these tips and guidelines, you’re now equipped to install a mailbox that is both practical and visually appealing. Ensuring compliance with USPS regulations while focusing on durability and design will help you create a functional addition to your home that enhances its curb appeal. Take the time to choose the right materials and placement to enjoy a long-lasting and secure mailbox for years to come.


