
Captivating photography is the secret to selling or renting your home. After all, first impressions are really important, and stunning images can draw in potential buyers and set your property apart from the competition.
Luckily, you don't need a professional photographer degree to stage a property and capture beautiful images. All you need is proper techniques and planning, and you can capture your property's best features.
This article will highlight seven essential home staging photography tips to ensure your property shines in every shot.
1. Define Your Vision
Before you grab your camera, take a moment to define your vision for the shoot. What aspects of your home do you want to highlight? Are there specific rooms that showcase your home's unique features?
Think about the story you want to tell through your photographs. This clarity will guide your staging and photography decisions.
Consider creating a shot list to organize your thoughts. Include each room, key features to focus on, and any specific angles or perspectives you want to capture. This list will keep you on track during the shoot and ensure you don't miss any critical details.
2. Clean and Declutter
Once you have a vision, it's time to prepare your space for staging. Clean and declutter every room because a tidy environment will help potential buyers visualize themselves living there. Remove personal items - such as family photos and excess decorations - to create a neutral canvas.
Focus on surfaces that often attract clutter, like countertops, tables, and shelves. A clean space appears more spacious and inviting, which is crucial for compelling home staging photography. This process enhances the aesthetic appeal and allows your home's features to take center stage in the photos.
3. Use Natural Light
Lighting can instantly affect the quality of your photos. That's why natural light is your best friend and why you should aim to take your photographs during the day when sunlight floods your home. Open curtains and blinds to let in as much natural light as possible to create a warm and inviting atmosphere.
However, direct sunlight can create harsh shadows and bright spots. To combat this, shoot during the golden hours - shortly after sunrise or just before sunset - when the light is softer and more flattering.
If you need to shoot on a cloudy day, avoid using the flash, which can create unflattering contrasts. Instead, rely on available light to maintain a natural look.
4. Choose the Right Angles
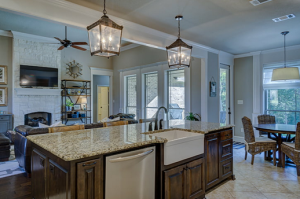
Image credit: PickPik
The angle from which you take your photos can significantly affect a room's appearance. Try shooting from a corner of the room to create a sense of space and depth. This technique captures multiple walls and gives a better perspective of the area.
Experiment with different heights as well. Shooting from slightly above eye level often provides a more appealing view. Don't hesitate to take multiple shots from various angles to ensure you capture the best representation of each room.
5. Highlight Key Features
Every home has standout features that can entice potential buyers. Highlight these elements in your photographs, whether it's a beautifully designed kitchen, a cozy fireplace, or stunning outdoor views.
Use close-ups to showcase intricate details - like the texture of your countertops or the quality of your fixtures. Capturing these highlights helps create an emotional connection with viewers and encourages them to imagine themselves in the space.
6. Stage Your Home Thoughtfully
Effective staging can transform your space and enhance its appeal. Arrange your furniture in a way that flows naturally, allowing potential buyers to picture how they would navigate the home.
Include shots of hallways, doorways, and outdoor spaces to create a comprehensive narrative of your property. Consider the purpose of each room and stage it accordingly - an office should look like a productive workspace, while a living room should feel inviting and cozy.
Incorporate tasteful accessories, such as throw pillows, plants, and artwork, to add warmth and personality without overwhelming the space. Remember to keep the decor neutral to appeal to a broader audience.
7. Edit Your Photos
Finally, after taking your photographs, it is crucial to enhance them through editing. Editing lets you bring out the best in your images while ensuring they accurately represent your home.
Canva is a user-friendly way to edit photos quickly. It offers a variety of editing tools, including a simple background remover that can help you isolate key features and create a cleaner look for your photos.
When editing, focus on adjusting brightness, contrast, and saturation for a natural appearance. A little editing can significantly polish your photos and make them more appealing to potential buyers.
Conclusion
These tips will help you create beautiful images that effectively market your property. Take the time to implement these techniques, and you'll set yourself up for success in the competitive real estate market. Good luck with your photography, and happy staging!
Image credit: Flickr