
Are you working from home, tilting your head all the time, and ending up with back or neck pain? You may not know it, but your posture and comfort can be improved with a sturdy, portable laptop stand. However, those can be expensive.
Granted, you can always buy a cheap one, the problem with most cheap laptop stands is that they are weak and are not as environmentally friendly as we would want them to be. If that’s your case, considering building your own. With a few simple materials, you can build your own portable laptop stand in six, easy steps.
To build an affordable yet reliable stand that can support your home office laptop comfortably, you will need to get an empty cardboard box. Ideally, a cardboard box used to ship electronics such as fridges, television sets, microwaves, and so forth will work just fine. Other than the cardboard, you’ll need:
- Cardboard box (1-3)
- Cutting Mat
- Ruler (preferably metal)
- Scissors or Exacto knife
Step 1: Find the Cardboard
If you don’t have any cardboard lying around, consider going to a recycling center, or on your next shopping trip, ask the store if they have any cardboard box you can take home with you. If all fails, ask your family members or friends, most likely they’ll have some cardboard boxes lying around.
Make sure you get several cardboard pieces to work with. Normally, these will vary in size. This will ensure you have some extras to continue with your project should you mess up the first try or two.
Step 2: Creating Your Workspace
The shapes will need to be cut precisely if you are to make a good stand to suit your needs. The first thing you need to do is set up your workstation and gather your materials. For starters, you will need the right workspace.
If you are working indoors, you will need to get a cutting mat. This will ensure you protect your tabletop or floor from accidental cuts when you are working. The workspace should be clean and free from clutter.
Step 3: Cut the Shapes Required
Now that you have a clean workspace, you need to gather the tools you will use. Ideally, you need a sharp utility knife, one of our must-have tools for DIY projects. Alternatively, you can use a utility knife or box cutter.
Another item you will need is a ruler. A metal ruler is recommended. This is because it is sturdier and stronger than its plastic counterpart; however, any ruler will suffice.
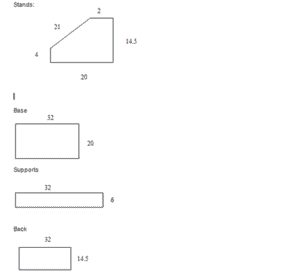
You need to cut shapes for the stands, support, back, and base. You need 6 stands, 2 supports, a back, and a base. Note: All measurements are in centimeters.
Step 4: Confirm the Parts Will Fit Together
Use some pins to ensure all pieces are put together. Start by placing the 6 stands on the base and use some pins to secure them. The idea is to space them about 1-2 inches apart. This will let each fit on the base.
Once you are done, you can fit the side supports. Each support should be placed on each side of the base.
Now you can place the back on the side of the six strands. Make sure everything fits snugly. You should have something like the image below:
Now you have an idea of what the stand will look like, you can start gluing it together. The reason why you use pins initially is to ensure you can make changes should there be any need. The glue you use should not be special; you can use normal PVA or super glue.
Step 5: Glue the Parts
One of the best ways to successfully glue the different parts is by ensuring you trace out where each part will meet with its counterpart. For example, you can trace out the area the stands will need glue to stick to the base. Do the same for the side supports and the back.
Use enough glue on all these areas. The more glue you use, the better, although you should use your judgment, not to over glue. Now let the stand dry. If you are using super glue, this should take less than fifteen minutes.
Step 6: Finish Up
Wait for about an hour if you are using normal office glue. Now you can test your stand by placing your laptop on it. The stand is strong and it may not even cost you a dime to get the supplies required to build it. Enjoy!
Conclusion
There you have it, an affordable alternative to be more comfortable and productive while you work from home. This portable laptop stand can help you in a pinch or even save you money, not only in a possibly unnecessary purchase but also from saving your laptop from overheating. Stay safe and keep working on new exciting DIY projects.