

We should always feel safe in our homes. It is our sanctuary and escape from the outside world and a place to rest our heads peacefully at night. However, some homeowners may be at risk in their own homes without even knowing it. Radon is a naturally occurring gas that is produced from the radioactive decay of uranium in soil and rocks. Odourless, tasteless, and colourless, radon gas has the ability to seep through cracks in your foundation, walls, and floors, as well as floor drains and sumps.
We often aren’t aware of the presence of radon until it’s too late. Fortunately, you can take preventative measures. By having radon testing conducted on your home, you can confirm whether you and your family are in danger of radon exposure. This is a simple enough process, and professionals who specialize in radon testing will be with you every step of the way.
Once high levels of radon are detected, what are the next steps? Radon mitigation is the process of reducing or eliminating these high levels of radon, allowing you to continue living in your home safely and with peace of mind. For those interested in how the process of installing a radon mitigation system may look, take a look at the steps below. However, as a note, it’s highly recommended that you turn to a professional for this installation. Radon gas reduction is a science, so making its removal a DIY project is advised against and normally results in unsatisfactory results.
Step 1
Using a wet saw or a rotary hammer, drill a hole in the concrete slab of your basement. This hole will need to be large enough to receive a 4-inch PVC pipe. If you are using a rotary hammer or any other tool that will kick up concrete dust, so take appropriate precautions.
Step 2
Close all windows and doors. Perform detailed diagnostic testing and calculations to determine sub-slab pressures to be used in choosing an appropriately sized fan for the mitigation service. If the fan is too small it won’t allow for an effective system and if the fan is too large it will be unnecessarily loud and can potentially cause backdrafting of appliances such as your hot water tank.
Step 3
Once you have your suction hole drilled, you’ll want to dig a small pit below the slab. If the layer below is granular, such as gravel, you will only need a small pit. However, if the soil is dense, a larger pit will be needed to increase the area the fan will pull from.
This step aims to create a sump, allowing all the air to accumulate in one area before the fan pulls it out. By removing any loose debris and ensuring the space is cleared out properly, you can reduce the strain you are placing on the fan.
Step 4
Apply a vacuum to the sub-slab. Using a flow meter, calculate the CFM of air being removed from the sub-slab. Return to the far corners to measure the pressure change. At this point, you should be able to see if the system you are about to install is actually going to work. Once you are able to observe adequate pressure change to the far corners of the basement and the correct fan size determined, you are ready to install the system.
Step 5
Next, you’re going to run your 4-inch PVC pipe throughout the rim joist of the basement. You will need to glue the joints of the pipe together, support the pipe with straps where necessary, and take necessary precautions with placement to allow for draining of condensation.
Step 6
Now it’s time to install the final piece of the pipe. Using a specific gasket, you will need to place it several inches into the hole in your concrete slab, entering the space you have cleared out.
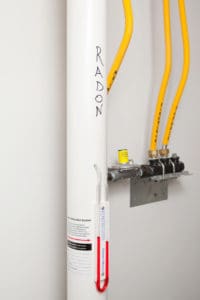
Step 7
Install a manometer to the pipe. The manometer measures the vacuum pressure of the fan and allows the homeowner to verify that the system is working. If the manometer is sitting at zero on both sides of the gauge, then it indicates that the fan is not functioning as it should. However, if the fan is working properly, one side of the water column should rise while the other side should drop.
Step 8
Some professionals may choose to perform this step first, however the order doesn’t really matter. The goal of this step is to test the system to ensure it’s working effectively. Small holes are drilled into a couple of locations in the basement’s foundation to test the suction. Smoke can be injected into the holes, and if the system is working properly, the smoke should be sucked into the space beneath the foundation, rather than filtered up. The holes will then be plugged with hydraulic cement once the test has been successfully completed.